Thursday 5 January 2017

''STOPWATCH WITH LAP TIMES'' MINI PROJECT

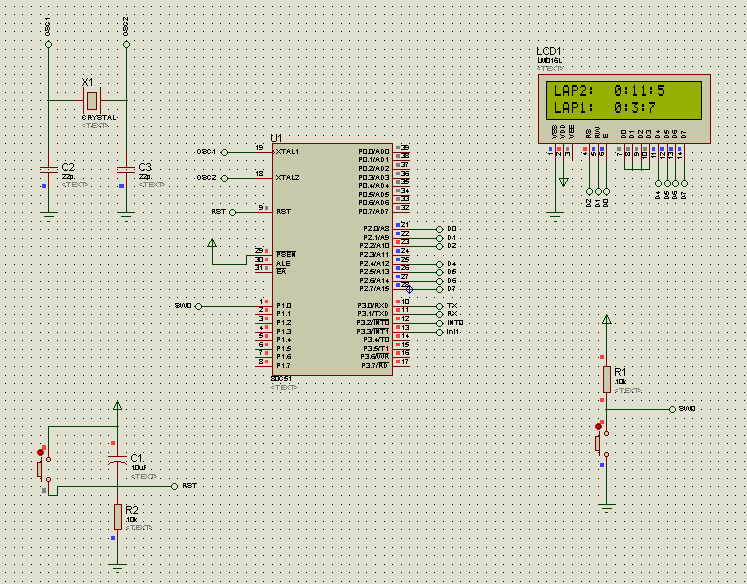
In this mini project, we are going to make simple stopwatch by using microcontroller 89C52 tools kit and LCD display. A stopwatch allows you to record the exact number of hours, minutes, and seconds. It is a special type of watch with buttons that start, stop and then zero the hands, used to time races. 

Objectives:
  1. To design and construct the Stopwatch with Lap Times using 8052 microcontroller (AT89C52).
  2. To interface the Stopwatch with Lap times with C language into AT89C51

Description of the stopwatch with lap times

             In this project, a stopwatch timing functions are traditionally controlled by one push button and microcontroller 8052 forms the processing part which firstly receives data when the switch is pressed for the first time. The result obtained from the above operation is given though output port of 8052 to LCD display of relevant data.

              In this system, the timer will start running indicated the first lap when the push button is pressed. When the push button is pressed for the second time, the timer will stop the first lap and display at the LCD while second lap is start running continue from the first lap. For the third time, the second lap will stop and display the second lap time. 


Flowchart of software interfacing


Parts List:
  • 16x2 LCD display
  • 89C52 uc kit
  • IC 89C52
  • Toolstick850-b-sk
  • Resistor 10k 
  • Switch button
  • Male pin connector strip 
  • Strip board
  • jumper dupont wires

Software and circuit functional block diagram 

i)  LCD display "FIQ MAL JAHID" & "STOPWATCH"
     
     
      -  Students name is appeared when the power supply is connected 


ii) LCD display LAP 1 and LAP 2


    -  When switch is pressed for the first time, the first lap is going to count up

     -  Switch button is pressed for the second time to indicate first lap and continue the second          lap

     -  For the 3rd time switch is pressed, Lap 1 and Lap 2 display in the LCD 


Analysis

Regarding to our mini project title Stopwatch with Lap Times, the experiment is successfully done and it running in good condition. Basically from the above title, we are making Stopwatch with Lap Times by implementing Proteus software to make its schematic diagram and Kiel uVision for its coding. Our device runs on 5V of supply, the device will start and LCD will display name and title of our groups.


Then, push button is pressed to run the first lap of the stopwatch. At the preliminary stage of developing this project. The LCD was a bit sensitive when the push button is pressed. After troubleshoot the coding, we found that the delay for the LCD is not suitable. We changed the value of the delay to make it more accurate when pushing the push button.


Conclusion 

In this mini project, the objective is to appreciate the hardware and software interfacing of a microcontroller system. Besides that, the aim is to design, write and test an assemble programming which meets a technical specification in a given target system. Throughout this mini project we have learn on how to apply all of our basic knowledge in the making of the flowchart, designing circuit, write program and assemble the program. Thus, the objective is achieved. By constructing both software and hardware, we have learned on how the process of making the stopwatch with lap times.

             Next, the objectives of the project are also achieved as we successfully make a fan that automatically regulated by the detected temperature and also successfully make this project using 8051 Microcontroller system. Furthermore, this mini project has taught us on how to appreciate the software interfacing of a microcontroller system. So, we can conclude that the entire objectives are achieved.  

References
  1. The 8051 microcontroller and embedded system using assembly and C by Muhammad Ali Mazidi
  2. http://www.ece.utep.edu/courses/web3376/Lab_5_-_LCD.html
  3. Lecture notes

Monday 2 January 2017

STOPWATCH WITH LAP TIMES VIDEO


This is the video of practical and simulation

You also can watch the video in this YouTube link below:


Pin description LCD display:


                                       LCD pin diagram 

 Pin                Symbol                                          Description
  1                    GND                                               Ground
  2                     Vcc                                                  +5V
  3                     Vee                               Contrast Adjustment -2V to -5V
  4                      RS                                           Register Select
  5                     R/W                                     1 - Read, 0 - Write
  6                      EN                                                 Enable
  7                     DB0                                              Data Line
  8                     DB1                                              Data Line
  9                     DB2                                              Data Line
 10                    DB3                                              Data Line
 11                    DB4                                              Data Line
 12                    DB5                                              Data Line
 13                    DB6                                              Data Line
 14                    DB7                                              Data Line
 15                    Led+                             Power supply for back light, Vcc
 16                    Led-                           GND connection for back light, GND


C Program:

#include <reg52.h>
#include "stdio.h"
#include "lcd_header.c"
#include "delay.c"
#define DATA P2

sbit SW0 = P1^0;


const unsigned int str[10];

int milisec,sec,minute;
char flag = 0;

void main (void)


{

  Initialize_LCD();

  send_control(0x80);

  puts_lcd(" FIQ MAL JAHID    "); 

  send_control(0xC0);

  puts_lcd("   STOPWATCH      ");

  while(SW0);

  delay_1ms(10);

  send_control(0x01);

  delay_1ms(100);
  

while(1)


{


milisec++;

delay_1ms(50);

if (milisec>=10){

milisec=0;
sec++;
     if (sec>=60){
        sec=0;
        minute++;
        }

 }


  send_control(0x80);

  sprintf(str,"     %d:%d:%d  ",minute,sec,milisec);
puts_lcd(str);


if (!SW0 && flag==0){

delay_1ms(100);
     send_control(0xC0);
     sprintf(str,"LAP1:  %d:%d:%d ",minute,sec,milisec);
     puts_lcd(str);
     flag=1;
     
     }
if (!SW0 && flag==1){
delay_1ms(100);
     send_control(0x80);
     sprintf(str,"LAP2:  %d:%d:%d ",minute,sec,milisec);
     puts_lcd(str);
     milisec=sec=minute=0;
     ET0=0;    

while(SW0);

delay_1ms(100);     
milisec=sec=minute=0;
flag=0;
send_control(0x01);
puts_lcd("");
ET0=1;     

    }

}


}


Download C program, HEX file, Proteus simulation file, etc using below link.

Friday 30 December 2016

PROGRESS WORK 

The image below is progress work by three (3) of us during week 13


  • This is the image of switch button that has been soldered. 


  • A 16x2 LCD display an output "FIQ MAL JAHID" and "STOPWATCH"


  • The image above shows for both Lap 1 and Lap 2 after switch button is pressed for 3rd times to get the time of each lap.

It is meaning that our mini project is successfully completed by us

Saturday 10 December 2016

PROPOSAL WRITING

Introduction


                    Figure 1: Analog stopwatch                Figure 2: Digital stopwatch                              


         Stopwatches can be classified into two categories, Type I and Type II. In general, stopwatches are classified as Type I if they have a digital design employing quartz oscillators and electronic circuitry to measure time intervals (Figure 1). Type II stopwatches have an analog design and use mechanical mechanisms to measure time intervals (Figure 2).
                                         
A stopwatch is a handheld timepiece designed to measure the amount of time elapsed from a particular time when it is activated to the time when the piece is deactivated. A stopwatch is controlled by two buttons which is the first button can start and stop the times lap and the second button are to reset the stopwatch to zero. The second button is also functioned to record split time and lap times. When the second button is pressed while the stopwatch is running, the display freezes, allowing the elapsed time to that point to be read, but the watch mechanism continues running to record total elapsed time.


Block diagram


Basic schematic diagram


Bill of materials (BOM)


    Wednesday 7 December 2016

    PURCHASE COMPONENTS OF THE MINI PROJECT

    1)  We just ordered the components at Facebook page ''Micro Hobby''. The components include of        89C52 uc kit, IC 89C52, Toolstick850-b-sk and jumper dupont iwres.

    You can check at the link below of their facebook page:


    The purchase includes 89C52 uC kitIC 89C52jumper dupont wires and Toolstick850-b-sk.


    2) We have bought some of the components in Jalan Pasar, Kuala Lumpur

    The component is
    - 16x2 LCD
    - Resistor 10k
    - Resistor 330
    - Switch  button 2 pin
    - Strip board
    - Crystal 11.0592 MHz
    - Capacitor 10 uF

    This is the image of total price for the purchases components in Jalan Pasar


    So, the total price for these components is RM 24.50


    Sunday 4 December 2016

    RESEARCH ABOUT THE COMPONENTS USED IN THE MINI PROJECT


    List of components:

    1. 89C52 uc kit


    2. Toolstick850-b-sk


    3. Liquid Crystal Display (LCD) 


    4. Resistor 


    5. Switch button 


    6. Strip board


    Monday 21 November 2016


    THE SELECTION OF MINI PROJECT TITLES

    This week we have given a list of mini project titles. Each group must consists of 2 or 3 person and they need to pick one of the titles given below:-


    • Countdown timer with display chimes and setting switches
    • keypad door access system with magnetic locks
    • Indoor light dimmer
    • Digital speedometer-cum-odometer
    • Infrared motion detector with strobes lighting
    • Speed limiter and alarm for heavy vehicles
    • Digital calendar
    • Stopwatch with lap times
    • School bell timer
    • Digital tachometer
    • Queue control system (2 counters)
    • X-Y plotting table
    • Heart rate monitor
    • Temperature controlled fan regulator
    • Frequency generator
    • IR distance meter
    • Odometer for bicycle
    • Pedometer
    • 4 legged walking robot
    • Digital speedometer

    Each group divided into 3

    1. Mohd Jahid Alahnaf bin Zainal (51212114282)
    2. Ahmad Afiq bin ahmad Sabri (51212114014)
    3. Akmal bin azlan (51211114080)

    We have chose "stopwatch with lap times" as our mini project